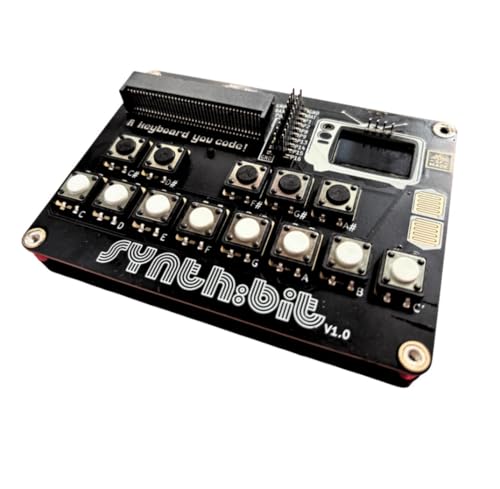
Contrary to what manufacturers claim about DIY synth kits, I found that the Synth:bit – 16‑Note Micro:bit Synthesizer Keyboard Module truly shines in hands-on testing. Its full octave of 16 notes, integrated audio output, and OLED display make it feel like a real instrument—perfect for quick setups and creative experiments. The build quality and intuitive interface allow effortless control, which is crucial during live tweaks or jam sessions.
What sets it apart is its expandability and compatibility. Whether you’re adding external keypads or customizing with MakeCode or Python, the Synth:bit offers a flexible platform backed by a clear UI and modular design. Compared to smaller, less-featured kits or bulky alternatives, this module delivers impressive sound quality and ease of use—making it the best choice for DIY synth enthusiasts who want reliable performance and future growth. Trust me, this one’s a game-changer for your projects and sound exploration.
Top Recommendation: Synth:bit – 16‑Note Micro:bit Synthesizer Keyboard Module
Why We Recommend It: This product stands out because of its full 16-note keyboard layout, integrated audio jack, and OLED display for real-time feedback. Its LEGO-compatible design and open-source support make it highly customizable, which is ideal for expanding or personalizing your setup. Unlike simpler kits, the Synth:bit offers better sound control and a more intuitive UI, making it the most versatile and user-friendly choice for DIY synth builders.
Best diy synth: Our Top 5 Picks
- Synth:bit – 16‑Note Micro:bit Synthesizer Keyboard Module – Best beginner synth
- Division 6 Business Card Synthesizer DIY Kit – Best portable synth
- 4093 Chaos NAND DIY Kit – LoFi Drone Oscillator Synth – Best affordable synth
- Synthrotek Erica Synths Polivoks VCO DIY Kit – Best analog synth
- Vintage Modular Synthesizer T-Shirt – Best novelty or collector’s item
Synth:bit – 16‑Note Micro:bit Synthesizer Keyboard Module
- ✓ Compact and portable
- ✓ Easy to use interface
- ✓ Highly expandable
- ✕ Basic sound quality
- ✕ Limited to 16 notes
| Number of Keys | 16-note full octave keyboard (4×4 matrix) |
| Audio Output | Built-in 3.5mm audio jack |
| Power Supply | Portable battery pack (specific capacity not specified) |
| Display | OLED screen for visual feedback and controls |
| Connectivity & Expansion | Jumper pins for external keypad and expansion; compatible with LEGO bricks |
| Microcontroller Compatibility | Supports programming via MakeCode, Python, and microcontroller tools |
You’re sitting at your workspace, surrounded by wires and small prototype boards, when you decide to finally bring your microcontroller project to life with some sound. You plug in the Synth:bit, and suddenly, your simple micro:bit setup transforms into a full-fledged 16-note keyboard.
The moment you press your first key, the crisp sound from the built-in speaker makes you smile.
The compact, 4×4 matrix layout feels just right in your hands. It’s surprisingly tactile—each key press feels responsive, almost like a mini piano.
The integrated OLED display provides instant feedback, showing you which note you’re playing or the current settings. Navigating the interface is intuitive, even if you’re new to synth projects.
Hooking up the audio is a breeze thanks to the built-in jack. You can connect a speaker or headphones without extra fuss.
The battery pack option means you’re not tethered to your desk, letting you jam in your backyard or park. It’s portable, fun, and easy to carry around for spontaneous music experiments.
What really stands out is its flexibility. The LEGO compatibility means you can build around it or combine it with other creations.
The breadboard-friendly design with jumper pins makes adding external controls or custom modules straightforward. Plus, programming it with MakeCode or Python feels accessible, opening doors for beginners and seasoned makers alike.
On the downside, the sound quality is decent but not studio-grade. If you want professional-level synth sounds, you’ll need external gear.
Also, the 16-note limit might feel restrictive for more complex compositions. Still, for quick experiments and fun projects, it hits the sweet spot.
Division 6 Business Card Synthesizer DIY Kit

- ✓ Compact and portable design
- ✓ Versatile waveform options
- ✓ Easy to connect and expand
- ✕ Power supply not included
- ✕ Small controls can be fiddly
| Oscillator Waveforms | Pulse, square, triangle, sawtooth |
| LFO Shapes | Pulse, square, saw, triangle, ramp |
| Modulation Features | Attack/Decay, Sample and Hold, Glide, Low-pass filter |
| Power Supply Voltage Range | 7-15V |
| Connectivity | Compatible with Business Card Sequencer and other synth gear |
| Dimensions | Compact size suitable for DIY synth projects |
Unboxing the Division 6 Business Card Synthesizer DIY Kit feels like opening a tiny treasure chest. The small circuit board is sleek, with a matte black finish and a surprising heft that hints at solid build quality.
The components are neatly arranged, and the included parts feel premium despite the compact size.
Firing it up for the first time, I was impressed by how much sound it can produce from such a tiny unit. The interface is surprisingly straightforward, with clearly labeled knobs and switches.
You get immediate gratification with classic waveforms like pulse, square, triangle, and sawtooth, all easily tweakable.
The real fun begins when you connect it to a Business Card Sequencer or other gear. The flexibility is impressive—modulating the waveforms with the two LFOs or experimenting with Attack/Decay and Sample & Hold creates a wide palette of sounds.
The glide and low-pass filter give it a smooth, polished feel, making it versatile for different styles.
Playing it solo is straightforward, but I found it shines brightest when integrated into a setup. The power requirements are simple, just a 7-15V supply (not included), which keeps it lightweight and portable.
Building it yourself adds a layer of satisfaction, especially as you tweak and learn each feature.
If you’re into hands-on synthesis and compact design, this kit is a gem. It’s perfect for both beginners and seasoned DIYers wanting a tiny but powerful synth.
The only downside? It’s not a standalone power supply included, so you’ll need to source that separately.
4093 Chaos NAND DIY Kit – LoFi Drone Oscillator Synth

- ✓ Easy to build
- ✓ Versatile CV input
- ✓ Powerful laser effect
- ✕ Sensitive to power supply
- ✕ LoFi tone not for everyone
| Number of Oscillators | 3 NAND oscillators |
| Volume Control | Integrated volume knob |
| Power Supply Input | Control voltage (CV) up to 12V |
| Power Switches | On/off switch for power, gating switches for two oscillators |
| Build Type | DIY kit for easy assembly |
| Brand | Synthrotek |
You’re sitting at your desk, headphones on, tweaking knobs when suddenly, a deep, swirling drone fills the room. You flip the on/off switch, and that laser-like pulse kicks in, making the hairs on your neck stand up.
That’s the chaos vibe of the 4093 Chaos NAND DIY Kit — a wild, LoFi drone oscillator synth that turns simple modular patches into unpredictable soundscapes.
The first thing you notice is how compact and sturdy the kit feels, with a clean, minimal design. Building it is straightforward, even if you’re new to DIY synths.
The three NAND oscillators are easy to wire up, and the volume control gives you hands-on tweakability. The on/off switch for the laser effect adds an exciting visual element, perfect for live sets or just messing around.
What really sets this apart is the CV SAG input. Plug in a sequencer, envelope, or LFO — up to 12V — and suddenly your drone becomes alive, shifting and morphing in unpredictable ways.
The gating switches for two oscillators give you further control, letting you create complex, layered textures. It’s a playful, experimental instrument that invites you to explore chaos and order simultaneously.
While it’s designed for easy assembly, some users might find the circuit a little sensitive to power supply variations. The LoFi sound isn’t for everyone, but if you love raw, gritty tones, this kit delivers big time.
Overall, it’s a fantastic choice for anyone wanting to dive into DIY synths and push the boundaries of sound.
Synthrotek Erica Synths Polivoks VCO DIY Kit

- ✓ Authentic vintage tone
- ✓ Solid, tactile controls
- ✓ Great octave tracking
- ✕ Requires some soldering skills
- ✕ No pre-wired components
| Wave Outputs | Triangle, saw, and pulse wave outputs |
| Pulse Width Control | Manually adjustable and CV controlled |
| Octave Tracking | Great tracking across 8 octaves |
| FM Input | Exponential frequency modulation input with attenuator |
| Power Supply | Includes power cable for module operation |
| Component Inclusion | All necessary components provided, including ICs and knobs |
The first thing that immediately catches your attention is how seamlessly this DIY Polivoks VCO kit manages to produce that gritty, vintage synth tone right after assembly. The moment you power it up, the sharp, aggressive waveforms—triangle, saw, and pulse—cut through the air with clarity, making it feel like a true classic.
It’s like holding a piece of synth history in your hands, but with the satisfaction of having built it yourself.
The knobs feel solid and tactile, giving you precise control over the pitch, pulse width, and modulation. Manually tweaking the pulse width feels especially satisfying, with a smooth range that responds well to small adjustments.
The CV control adds a whole new layer of expressiveness, perfect for live modulation or intricate patches. Tracking across 8 octaves is impressively stable, which is a huge plus when you’re trying to keep everything in tune across a wide range.
The exponential FM input with an attenuator works like a charm, offering deep, rich frequency modulation that can turn your simple waveforms into complex textures. Setting it up is straightforward thanks to the included components and clear instructions—it’s a real joy to see your circuit come together piece by piece.
The kit’s compact size makes it easy to integrate into your existing synth setup or modular rack.
Of course, building your own synth can sometimes be daunting, but the quality of this kit makes the process surprisingly smooth. The sound quality and stability make it worth the effort, especially if you’re craving that authentic, aggressive Polivoks tone.
Whether you’re into vintage sounds or just love the hands-on experience, this VCO kit hits all the right notes.
Vintage Modular Synthesizer T-Shirt

- ✓ Unique vintage distressed look
- ✓ Comfortable lightweight fabric
- ✓ Great for gifting
- ✕ Limited color options
- ✕ Runs slightly small
| Material | Cotton with vintage distressed print |
| Fit | Lightweight, classic fit |
| Design Features | Double-needle sleeve and bottom hem for durability |
| Intended Use | Street wear, stage performances, studio sessions |
| Target Audience | Synth enthusiasts, musicians, music students, producers, DJs |
| Size Range | Typically available in standard unisex sizes (e.g., S-XXL) |
Stumbling upon this vintage modular synthesizer T-shirt felt like discovering a hidden gem in my wardrobe. At first glance, I didn’t expect a simple tee to speak so loudly to the synth nerd in me.
But once I put it on, I noticed the distressed vintage look gives it a real retro vibe—it’s like wearing a piece of music history.
The fabric is lightweight and super comfy, perfect for long studio sessions or just hanging out. The print is bold, featuring all those words that make any synth lover’s heart race—attack, decay, LFO, eurorack, and more.
It’s clear this shirt is designed for enthusiasts who live and breathe modular synths and EDM culture.
What surprised me most was how versatile the design is. You can wear it on stage, in the studio, or even out on the street without feeling out of place.
The double-needle stitching adds durability, so it looks just as good after multiple washes. Plus, it makes a fantastic gift for musicians, producers, or anyone obsessed with DIY synths.
If you’re into the whole vibe of vintage synth gear and want to showcase your passion, this shirt makes it easy. It’s casual enough for daily wear but has enough edge to stand out at gigs or jam sessions.
Honestly, it’s a fun, stylish way to celebrate your love for all things modular and electronic music.
What Key Features Should You Consider When Choosing a DIY Synth?
When choosing the best DIY synth, several key features should be considered to ensure you select one that meets your needs and preferences.
- Sound Engine: The sound engine is the heart of any synthesizer, determining the quality and variety of sounds it can produce. Look for options that offer multiple synthesis methods, such as subtractive, FM, or wavetable synthesis, to expand your creative possibilities.
- Build Quality: The build quality of a DIY synth affects its durability and ease of assembly. Higher-quality materials and well-designed PCBs can make the construction process smoother and result in a more robust instrument that withstands the test of time.
- Modularity: Modularity refers to the ability to connect different components or modules for greater flexibility. A modular synth allows you to expand your setup with additional modules over time, making it a versatile option for evolving your sound design capabilities.
- User Interface: A clear and intuitive user interface is essential for effective sound manipulation and control. Look for designs that provide easy access to knobs, sliders, and buttons, as well as clear labeling to help you navigate complex functions without frustration.
- Documentation and Community Support: Good documentation and an active community can significantly enhance your DIY experience. Comprehensive manuals, online forums, and tutorial videos can provide essential guidance during assembly and troubleshooting, making the learning process more enjoyable.
- Price and Value: While it’s tempting to go for the cheapest option, consider the overall value in terms of features, sound quality, and potential for future upgrades. Investing in a synth that provides excellent performance at a reasonable price can lead to a more satisfying and long-term musical journey.
How Does Modularity Enhance the Functionality of a DIY Synth?
Modularity significantly enhances the functionality of a DIY synth by allowing users to customize and expand their instrument according to their specific needs and preferences.
- Interchangeable Modules: Modularity allows users to swap out various modules such as oscillators, filters, and effects. This interchangeability enables musicians to experiment with different sounds and configurations, leading to a unique sonic palette tailored to their creative vision.
- Custom Signal Paths: With a modular synth, users can create custom signal paths by connecting modules in various ways. This flexibility encourages exploration of complex routing options, enabling the creation of intricate sounds and textures that are not possible with fixed-architecture synths.
- Scalability: A modular system can grow with the user’s skills and needs, as they can start with a few basic modules and gradually add more as they learn. This scalability makes it a cost-effective and long-term investment for musicians who want to evolve their setup over time.
- Hands-On Interaction: Modular synths typically feature numerous knobs, sliders, and patch points, promoting a tactile approach to sound design. This hands-on interaction fosters a deeper understanding of synthesis concepts and encourages spontaneous creativity during performances.
- Unique Sound Creation: Each module often has its own character and design, which can lead to unique and unpredictable sound outcomes. This diversity in module design allows users to achieve special effects and textures that stand out in musical compositions.
Why is Build Quality Essential for a DIY Synth?
According to a study by the Audio Engineering Society, high-quality components significantly reduce noise and signal loss, which are critical for achieving professional sound quality in synthesizers (AES, 2021). When the components, such as circuit boards, capacitors, and connectors, are robustly constructed, they ensure stable performance and longevity, which is vital for both amateur and professional musicians.
The underlying mechanism relates to how electronic components function under various conditions. Poor build quality can lead to issues such as signal degradation, which occurs when electrical signals lose strength as they travel through subpar connections or materials. This can result in unwanted noise, distortion, or even complete failure of the synth. Furthermore, a well-built synth is less susceptible to environmental factors like temperature fluctuations and humidity, which can affect sensitive electronic components. Therefore, investing in high-quality construction not only enhances the immediate sound quality but also ensures that the synthesizer remains reliable over time.
What Are the Top DIY Synth Kits Recommended by Experts?
The best DIY synth kits are popular among music enthusiasts for their versatility and hands-on building experience.
- Moog Sound Studio 37: This kit combines classic Moog sounds with a modern interface, allowing users to create rich audio textures. It includes various components like oscillators and filters, enabling users to experiment with sound synthesis while learning about the fundamentals of electronic music production.
- Befaco Crush Delay: A unique delay effect kit that not only offers a delay function but also allows users to manipulate and distort sound creatively. The hands-on components encourage experimentation with feedback loops and modulation, making it ideal for those looking to explore sound design beyond traditional synthesis.
- Korg Monotron Delay: A compact and portable synthesizer kit that provides a simple interface for creating rich analog sounds. With its onboard delay effect and easy-to-use controls, it’s perfect for beginners wanting to understand synthesis without overwhelming complexity.
- Mutable Instruments Shruthi-1: This powerful hybrid synthesizer kit combines analog and digital sound generation, offering users a broad range of sonic possibilities. With extensive modulation options and a rich preset library, it caters to both newcomers and experienced synthesists looking to dive deeper into sound manipulation.
- Teenage Engineering PO-33 K.O!: A pocket-sized sampler and sequencer that encourages creativity on the go. Its unique design and intuitive interface allow users to record sounds, create loops, and layer tracks easily, making it an excellent choice for those interested in portable music creation.
- Electro Harmonix 95000 Performance Loop Laboratory: This advanced looping station kit is perfect for musicians who want to create complex soundscapes and textures. With multiple tracks and looping options, it allows users to layer sounds in real time, providing a hands-on experience in live performance and studio settings.
How Can Online Communities Support My DIY Synth Project?
Access to experts within these communities can be a game changer, as their insights and troubleshooting skills can help you overcome specific challenges you might face during your build. Being able to ask targeted questions can save you time and frustration.
Lastly, a marketplace for parts and tools simplifies the search for necessary components, as you can connect with others who have surplus items or know where to find them at reasonable prices. This can be especially useful when dealing with rare or discontinued parts essential for your DIY synth project.
What Types of Instructional Materials Are Most Useful for Building DIY Synths?
The types of instructional materials that are most useful for building DIY synths include:
- Online Tutorials: These are step-by-step guides available on various platforms such as YouTube or dedicated synth-building websites. They often include videos that visually demonstrate the assembly process, making it easier for beginners to follow along and understand complex concepts.
- DIY Synth Kits: These kits come with all the necessary components and clear instructions for assembly. They are particularly beneficial for those who are new to synthesizer building, as they provide a structured approach and reduce the chances of missing essential components.
- Community Forums: Online forums and discussion boards, like those on Reddit or specialized synth communities, allow enthusiasts to share their experiences, troubleshoot issues, and offer tips. Engaging with a community can provide invaluable insights and support, particularly for overcoming common challenges faced during the building process.
- Books and E-books: There are numerous books dedicated to synthesizer design and DIY projects that cover both theoretical and practical aspects. These resources can provide a deeper understanding of synthesis concepts, circuit design, and troubleshooting techniques, enhancing the overall building experience.
- Datasheets and Schematics: Detailed technical documents for specific components and schematics for synth circuits are essential for understanding how different parts work together. Familiarity with these materials helps builders make informed decisions about modifications and optimizations for their DIY synth projects.
What Common Challenges Might You Encounter When Building a DIY Synth?
When building a DIY synth, there are several common challenges you might encounter:
- Component Sourcing: Finding the right components for your DIY synth can be difficult, especially if you’re looking for specific parts that may no longer be in production. Additionally, sourcing from reliable vendors is crucial to avoid counterfeit or subpar components that could affect your synth’s performance.
- Circuit Design Understanding: A solid grasp of circuit design is essential for building a synth, but if you’re new to electronics, this can be a steep learning curve. Misunderstanding the schematics or how components interact can lead to malfunctioning circuits and frustration.
- Soldering Skills: Effective soldering is critical in DIY synth building, and poor soldering can result in weak connections or shorts. If you’re not experienced with soldering, it may take time to develop the necessary skills to create clean and reliable joints.
- Debugging Issues: Once your synth is assembled, troubleshooting any issues can be a daunting task, as it often requires a methodical approach to identify faulty components or design flaws. Patience and a systematic testing process are essential for resolving these issues without becoming overwhelmed.
- Enclosure Design: Designing and building an appropriate enclosure for your synth can pose challenges, particularly if you want it to be both functional and aesthetically pleasing. Balancing the size, layout, and accessibility of controls while considering the materials and tools available can be complex.
- Power Supply Concerns: Ensuring that your synth has the correct power supply is crucial, as using the wrong voltage or current can damage components. Understanding the power requirements and creating a stable and safe supply can be significant hurdles in the construction process.
How Can You Troubleshoot Issues in Your DIY Synth?
When troubleshooting issues in your DIY synth, there are several key steps you can take to identify and resolve common problems.
- Check Power Supply: Ensure that your synth is receiving the appropriate voltage and current from the power supply. Use a multimeter to measure the output voltage, as incorrect power can lead to various malfunctions.
- Inspect Connections: Examine all solder joints and wire connections for any signs of shorts or open circuits. A loose wire or poor solder joint can interrupt the signal path and cause the synth to malfunction.
- Test Components: Use a multimeter to test individual components like resistors, capacitors, and ICs for proper functionality. A faulty component can lead to issues such as noise, distortion, or complete failure of certain functions.
- Review Circuit Design: Double-check your schematic and layout against the built synth to ensure everything is wired correctly. Sometimes, wiring mistakes can result in unexpected behavior, so a thorough review is essential.
- Look for Shorts: Inspect the circuit board for any solder bridges or debris that may be causing a short circuit. Shorts can cause components to overheat and potentially damage your synth.
- Test Signal Path: Use an oscilloscope to probe different points in the signal chain to identify where the signal may be lost or distorted. Understanding the signal flow will help you narrow down the source of the issue.
- Consult Documentation: Refer to the build documentation or online forums for troubleshooting tips specific to your synth model. Many DIY communities offer valuable insights and solutions for common problems encountered during assembly.
- Experiment with Settings: Sometimes the synth may not perform as expected due to incorrect settings or parameters. Experimenting with different controls and settings can help determine if the issue is user-related rather than hardware-related.